I was looking for a different application for soft pastels - and a way to creatively use all the little left over bits and pieces that seem to accumulate at an astonishing rate! On Pinterest I stumbled upon
this great lesson from artisan des arts, using a technique I had never seen before - using soft pastels almost like a marbling medium! I'm not really sure how to label this one - it's not exactly marbling, but it's not a painting either. Either way, it's great fun and very effective - these on-line photos really don't do them justice!
") |
| Charli B |
") |
| Libby E |
") |
| Luka M |
") |
| Tasman S |
") |
| Charlize C |
") |
| Chan N |
") |
| Jakobe C |
") |
| Jordan O |
") |
| Madeleine M |
") |
| Sascha B |
") |
| Sophie K |
 |
| Maddy W |
 |
| James R-S |
 |
| Zara B |
 |
| Juliana K |
 |
| Hannah Y |
 |
| Kaiden S |
 |
| Macy E |
 |
| Mayah K |
 |
| Taleeha B |
I set up a table with 2 water trays (I used biscuit baking trays), paddle pop sticks and two baskets of old soft pastels (sorted into warm and cool colors).
Everyone gathered around for a demonstration -
1. Shake chalk pastel scrapings onto the surface of a shallow water bath (size of container needs to be just a little bit larger than the paper). Pastels can be scraped directly onto the water using a blunt knife, but to save time I pre-crushed ours into plastic containers with perforated lids. Both methods works equally well.
2. Hold the paper (I used quite a heavier weight 120gsm) in a U shape over the water and lower gently
3. As soon as the paper touches the water, let the sides curl down onto the water surface. This is pretty much the same technique used in traditional paper marbling... by touching the center of the paper first it stops (most) bubbles from forming between the paper and the water. Of course contact is needed for the paper to 'lift' the soft pastel from the water, so wherever there are air bubbles there will be no color.
4. Immediately lift the paper off the water and onto newspaper to dry flat. (It still curls, but once dry can be rolled in the opposite direction to re-flatten).
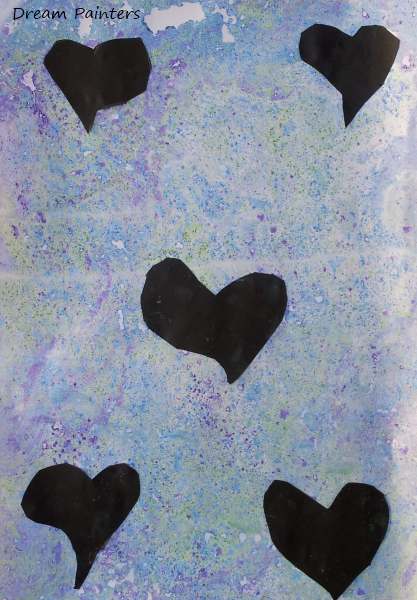
I set the class up at their desks with drawing materials and a sheet of A4 drawing paper folded into 4 rectangles. We talked about silhouettes, and the importance of creating interesting shapes, as once cut out it will only be seen as a solid shape with no inner detail. We brainstormed objects that would make interesting silhouettes, but other-wise I left their silhouette design completely open. They were asked to work on 4 different ideas, the best of which they would later use in their finished piece.
While they worked on their designs, I rotated students in to take their place the table to create their background.
Students then transferred their favourite design onto black paper, cut them out and glued them onto their backgrounds. For these sorts of projects I use glue pots made from small cylindrical screw-top plastic bottles and small skewers. I've found this really helps them to remember the 'just a dot, not a lot' rule, as each dip of the skewer only gives them 2 or 3 dots! I put less than a cm of white student PVA glue in each pot which is shared by 3 students. The pots are re-sealed at the end of each lesson (being careful to wipe the rim with a damp cloth so that it doesn't glue itself shut!) and generally last a week (for me, that's 5 lessons) without being topped up (saves a lot of wasted glue). I wash them out at the end of the week, so the pots never become clogged with dried-up glue.
The results of this lesson are just amazing! I love the marbling effect and silhouettes always look so dramatic! Best of all, it's easy and fun to do!

")
")
")
")
")
")
")
")
")
")
")


Never tried this before but sounds like fun!
I am doing owl silhouettes right now with my fifth graders. it doesn't seem to click with them that they don't need to draw all the details inside the shapes until after I make them paint it all black. Silly kids! ;) Great project!
What a great technique! I'm going to have to try this! Your students did a great job! :)
These silhouettes are gorgeous! I tried this suminagashi technique earlier this year using powder tempera paint with my 5th graders. When the artists pull the paper up they are so tickled!:) I love the sax player and the little jumping dude. Nice work!
Thanks Sunnylee, I think the jumping dude is actually a karate kid! :)
Hi Elizabeth,
Your kids did a fabulous job on both parts of the assignment! I have done the chalk/pastel marbling and it is so easy, like you said. Have you tried the shaving cream marbling with liquid watercolor? AMAZING! You mentioned in a previous post that you hadn't found any liquid watercolors "down under". I would be happy to send you some if you want to try them. You can e-mail me at
pstevens@cbcsd.org if you want to mail me your address. Liquid watercolor has changed the way I teach!
:)Pat
Thank you Pat, you are so kind! I feel so unbelievably lucky to be meeting people like yourself through this art blogging - it really builds a global community doesn't it? I feel like we are just next door!
I've done the shaving cream marbling - I used drops of food color, and the results were beautiful! Just a little bit messy for a group of 24 but loads of fun and the results were so worth it! We turned the marbled paper into Matisse fish bowls :)
I would LOVE to try the liquid water colors!! I'm off on holiday to Spain for a couple of months in 2 weeks (yeah!!!) but will certainly definitely absolutely email you on my return :)
Elizabeth
They are so beautiful! I love how each one is different.
these beautiful silhouette and the technique is fantastic I think I'll retry with my students!!
Post a Comment
Thank you for visiting Gr8 Art Fun!
We love it when you leave a comment - it tells us that you have enjoyed seeing our art as much as we have enjoyed creating it!!